Introduction
When having a business case to migrate your Oracle Analytics Cloud (OAC) instance to another region for example there is a way to perform an as-is migration. Today I will walk you through those steps and show you what to do and where to think about.
Snapshots
OAC works with snapshots. Those snapshots you can create for the whole OAC instance and can be used as a backup of your instance before deploying new reports, but also to migrate the data. Let’s take a look on how to create the snapshot. Snapshots can include everything. However, some datasets can not be migrated and are only stored locally in the snapshot as a backup. That data will be migrated at a later stage.
Snapshot Export
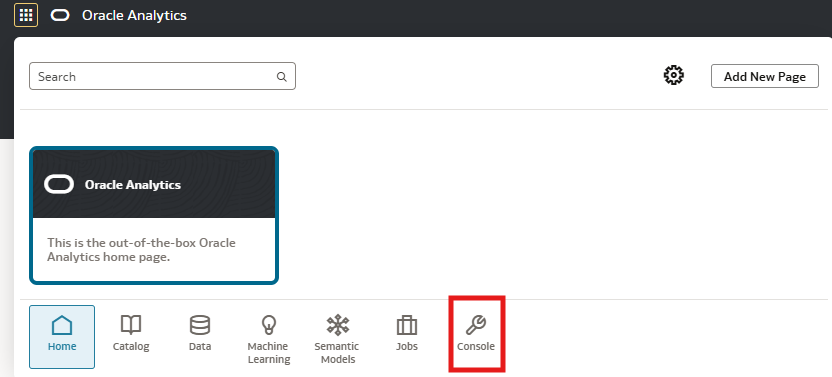
Login to your OAC instance. When on the landing page click in the top left corner on the menu button and click on console.
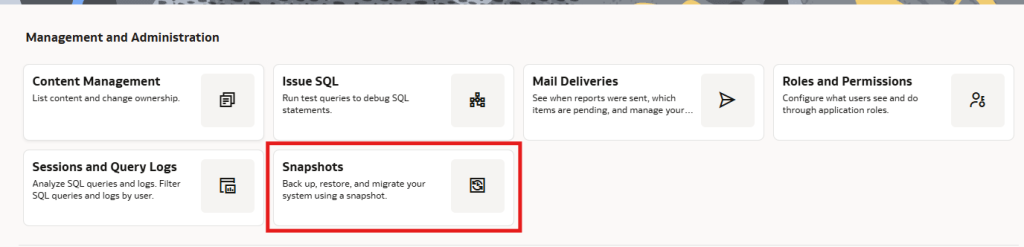
Next: Under Management and Administration click on Snapshots.
There you see all the snapshots created, or the possibility to create a snapshot. Let’s click on Create Snapshot in the top right corner.

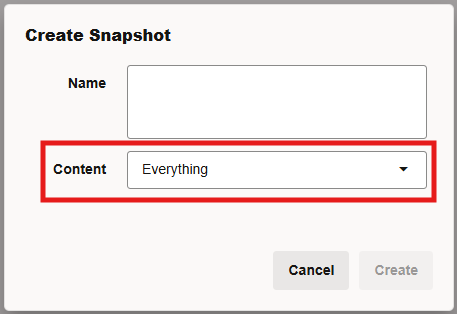
Give the snapshot a name and make sure you select Everything in the content option.
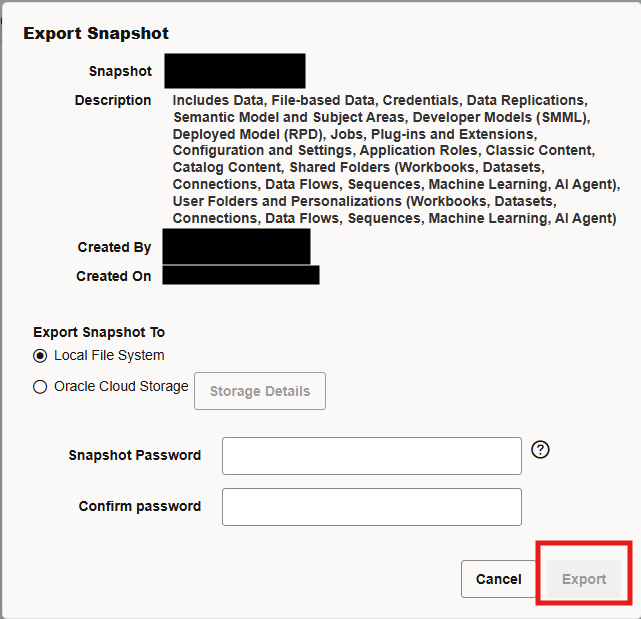
When the snapshot is created you should be able to export it. When you hover over the right side of the snapshot three dots appear. Click the three dots and then click Export.

You snapshot needs to be encrypted before you are able to export it. So set an encryption password. Then click Export. In this case we download the snapshot file.
Snapshot Import
Now we will import the snapshot to a new instance. This can be a clean OAC instance in another region, or even another realm of OCI. Note: The target instance has to have a version which is higher or equal to the destination instance. You cannot import a snapshot in a lower OAC version!
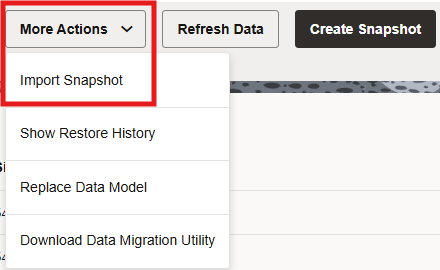
Navigate to the page in the new OAC instance of the snapshots. Now click on More Actions –> Import Snapshot
When you don’t have a virus scanner configured, click on Proceed without a virus scanner.
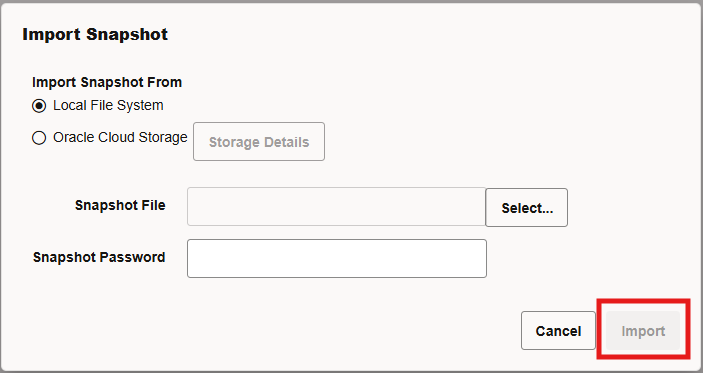
Select the file you juist downloaded and fill the snapshot password. Then click Import.
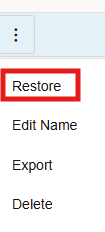
When the import is finished you should see the snapshot. Hover again over the three dots at the end of the line. Click on the three dots and click Restore.
Now you see the option to restore the snapshot. Make sure you select Replace Everything.
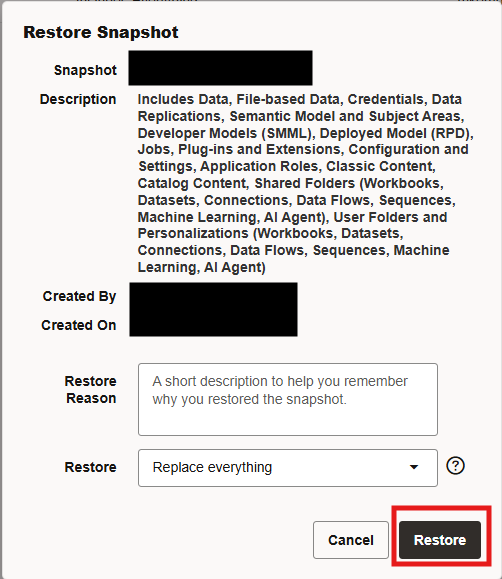
This will run for a few minutes.
Common error
When replacing everything it is also retrying to restore all the datasets. But as mentioned earlier, the manually uploaded files are not included as soon as you export the snapshot. The error you will see look probably something like this:
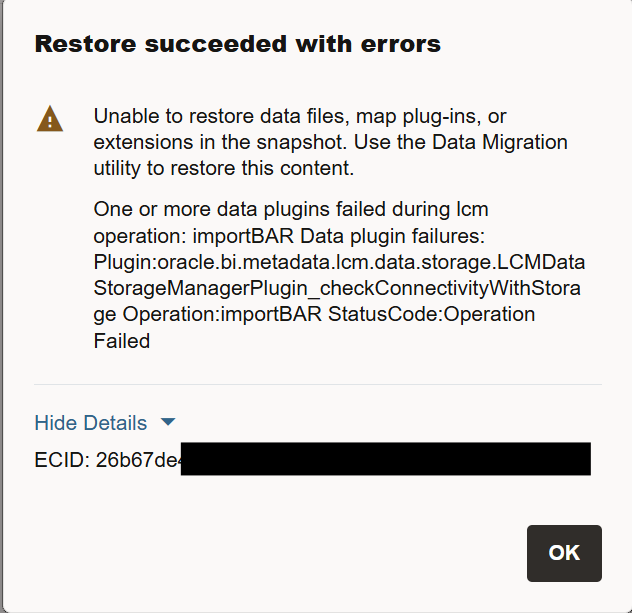
This can be fixed using the Data Migration Utility.
Data Migration Utility
The data migration utility is a tool that helps you migrate you data sets like manually imported CSV files. Let me show you how that works.
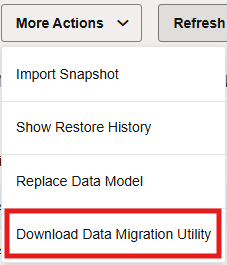
You can download the data migration utility in every OAC instance. There is no specific need of downloading it from a specific instance. If you navigate to the Snapshot page in OAC and click on More Actions and then Download Data Migration Utility it downloads a ZIP file.
In this case I will show you how it runs in a Linux machine.
Unzip the folder to a location on a Linux Machine. In the folder you see a file called config.properties. In that file you can set the variables for the migration. In this case, we only fill the first block of code as we do a migration. The first block is called MigrateData. Use my clode block here as a reference.
[MigrateData]
# Specify whether the source environment is OAC, OAS, BICS, or DVCS.
SOURCE_ENVIRONMENT=OAC
# Source URL. Either OAC, OAS, BICS, or DVCS. For example: http://sourcehost.com:9704 or https://sourcehost.com:443
SOURCE_URL=https://oacdev-xxxxxxxxxx.analytics.ocp.oraclecloud.com:443
# Name of a user with Administrator permissions in the source environment. For example: SourceAdmin
SOURCE_USERNAME=[username] # This is usually a local OCI IAM account. Can also be an email address if it is the username.
# Source ServiceInstanceKey
#SOURCE_SERVICEINSTANCE_KEY=<Source ServiceInstance Key>
# Location of the source BAR file. For example:  /tmp/20190307095216.bar
BAR_PATH=[path_to_your_file]/file.bar

# Target Oracle Analytics Cloud URL. For example: http://targethost.com:9704 or https://sourcehost.com:443
TARGET_URL=https://oacdev-xxxxxxxxxx.analytics.ocp.oraclecloud.com:443
# Name of a user with Administrator permissions in the target environment. For example: TargetAdmin
TARGET_USERNAME=# This is usually a local OCI IAM account. Can also be an email address if it is the username.
# Target ServiceInstanceKey.
#TARGET_SERVICEINSTANCE_KEY=<Target ServiceInstance Key>
As soon as the data is filled, save and close the file.
Next we will run the java application to start migrating the files. This is command to run:
java -jar migrate-oac-data.jar -m -config config.propertiesNow the application asks for three things:
- Source Administrator password (source instance)
- Password of your snapshot (created when exported)
- Target Administrator Password (Destination instance)
Depending on the amount of files it will take a few minutes to migrate everything. The result should look something like this:
[user@host migrate-oac-data]$ java -jar migrate-oac-data.jar -m -config config.properties
Jul 30, 2026 3:41:11 PM oracle.bi.bar.dr.util.DRUtils getOracleHome
INFO:   Oracle Home: /bi/app/fmw
Starting Data Migration Utility...
Log Path: /home/xxxxxxx/migrate-oac-data/logs/1785418871719/datamigration.log
Set Loglevel INFO
Java Version: 11.0.25
Recommended Java Version: 1.8+
Status File Path: /home/xxxxxxx/migrate-oac-data/logs/1785418871719/status.txt
Operation Selected : MigrateData


Invoking Data Migration...
Enter Source Password:

Enter BAR Encryption Password:

Enter Target Password:

Source Host: oacdev-xxxxxxxxxx.analytics.ocp.oraclecloud.com
Target Host: oacdev-xxxxxxxxxx.analytics.ocp.oraclecloud.com
Snapshot Prefix: c2fj-20857065-xxxxxxxxxxxxx
Source data files to be migrated: 760
Data files already migrated: 0
Migrating data files. Please wait...

Total Source data files: 760
Data files(ContentLegth match) found in target storage: 0
Data files(ContentLegth Mismatch) found in target storage: 0
Data files failed to migrate: 0
Data files succeeded to migrate: 760
Total target data files: 760
MigrateData completed successfully. Please restore the BAR again.
Completed Data Migration Successfully...
As soon as that is finished, the last thing we need to do is actually restore the data by restoring the snapshot again, but with Custom restore option.
Navigate to your Snapshots again in the destination instance. Restore the snapshot, but use the following options:
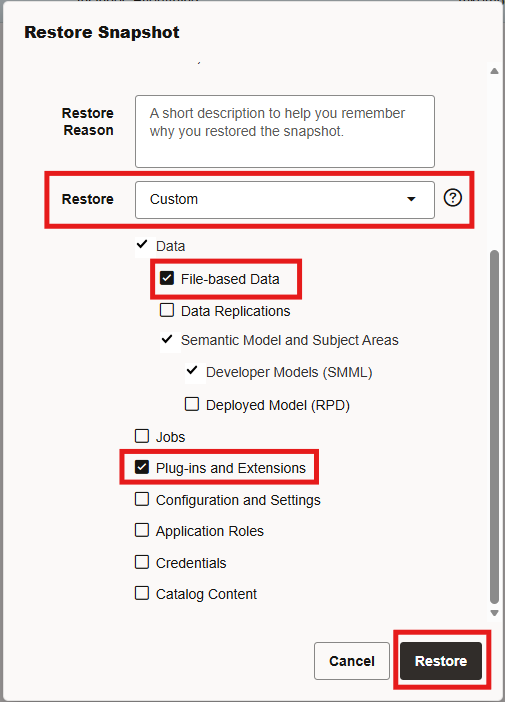
Then hit Restore.
It will probably run for a while as you might have several hundreds files that need to be restored like my example.
Post migration steps
As the migration is done as-is, you also have all the connection strings like in the source instance. So here are some reminders for you to take into account
- Connection strings need be changed if you also moved you Oracle Database or Oracle Autonomous AI Lakehouse.
- If you connect to private resource (like an Oracle Database on IaaS), do not forget to configure a Private Access Channel
- Make sure all the users that exist in the source instance, also exist in the destination with the same username. Then the local folders and profiles will be mapped.
All right, that’s a wrap! Hope this helped and see you next time 🙂